|
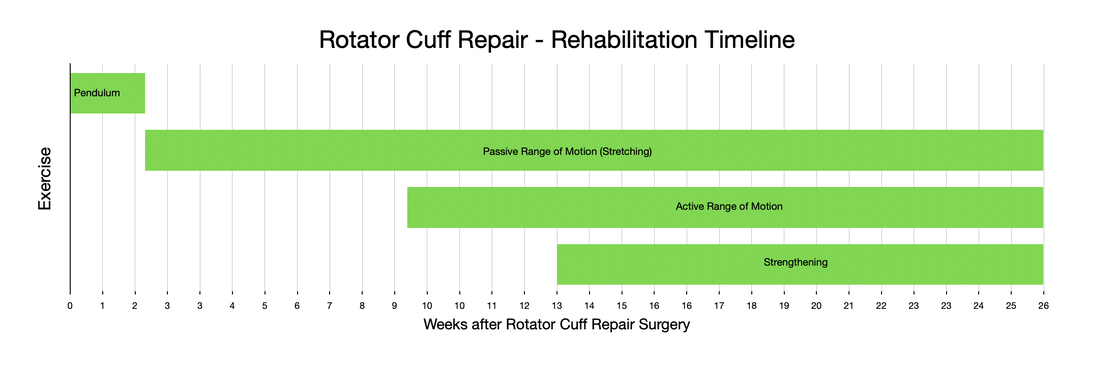
Rotator cuff repair is notoriously challenging to recover from. Not only is it generally painful, but it also requires adherence to a very specific protocol. Progressing too slowly results in prolonged stiffness and pain, while progressing too quickly risks the rotator cuff repair failing to heal. I recommend the following 4 steps. The first step begins at the time of surgery and ends 2 weeks after surgery. During this phase of rehabilitation I recommend minimizing any motion of your shoulder. Performing active finger, wrist, and elbow exercises is encouraged without limitation, but try to minimize any shoulder range of motion. Avoid any lifting, pushing, or pulling (even using only your hand) because it is really impossible to isolate your shoulder. You will be in an abduction sling, which allows the shoulder to rest, and takes tension off of the rotator cuff repair. To get dressed, and for hygiene, you will obviously have to temporarily remove the sling. Any motion of the shoulder during this stage must be passive only. The best way to accomplish this is via pendulum exercises. Step 2 involves intentional passive range of motion exercises. During this stage you still need to avoid any active range of motion. This is often difficult for patients. Following along with me in the accompanying video will very helpful. Stretching needs to continue on a daily basis from this point until you have full, symmetric range of motion with your other shoulder. Step 3 involves active range of motion. This is how we normally move around. Stretching should continue every day. No strengthening should occur yet. As you enter the final stage of rotator cuff rehabilitation, you will now add strengthening exercises. Strengthening should be done 2-3 times per week only. It is not appropriate to perform resistance exercises on a daily basis. The exercise stimulates the muscle to grow, it then needs a few days to actually grow. Most patients will continue to make progress with regard to range of motion, strength, endurance, and pain for an entire year following surgery. While the process is lengthy and unpleasant, careful adherence to this protocol will minimize the chance of ongoing stiffness and help prevent the rotator cuff from not healing. Many patients will need to continue stretching and strengthening for many months beyond what I have outlined above. This is normal, and anticipated. Continue stretching until you have achieved symmetry with your other shoulder. Continue strengthening until you are able to do all desired activities. most patients will report ongoing progress for an entire year following surgery.
2 Comments
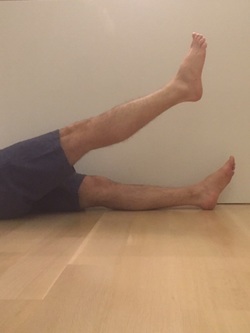
Also known as patellofemoral syndrome, anterior knee pain can be extremely frustrating for patients and surgeons alike. Anterior knee pain is extremely common and can have a variety of causes. Patellofemoral arthritis (knee-cap arthritis), and knee-cap dislocation (patellofemoral instability) are two diagnoses that can cause anterior knee pain, but they each will require a separate blog posting of their own. Patients experiencing patellofemoral syndrome complain of aching pain in the front of the knee which can range in severity from mild to intense. It is often made worse by sitting with the knee bent for a prolonged period (movie theater or back seat of car). In this situation the pain can be improved by extending the knee (straightening it). Climbing or descending stairs can also be quite irritating. This condition affects people of all ages and of all fitness and activity levels. I have diagnosed and treated this condition in marathon runners, adolescents, and patients who previously underwent total knee replacement. Usually the problem gradually worsened and has been present for a fairly long time when it gets to me. The key to the diagnosis is to listen to the patient. The history given tends to be very consistent. To better understand this condition, let's start with some background information. The patella (knee-cap) is subjected to the greatest force of any cartilage in the body (3-5 times body weight during normal activity and up to 10 times body weight when jumping). It is embedded within the extensor mechanism of the knee so that it can provide leverage to the quadriceps muscle group. The front of the knee is richly innervated and is thus very sensitive to abnormal pressures. The position of the femur (thigh bone) during activity will change the amount and distribution of forces on the patella. There is a very consistent examination finding associated with this diagnosis. Patients usually will have very weak hip flexors (muscles than bring the thigh forward relative to the torso) and hip abductors (muscles that bring the thigh away from the midline). Usually the hip external rotators will also be affected. What does the hip have to do with the knee-cap? The hip flexors and abductors are very important during the gait cycle (walking). The abductors must contract with great force to keep the pelvis level during single leg stance. The hip muscles together act as the "foundation" for your leg. If they are weak, your leg will be poorly controlled when walking. This can result in abnormal gait mechanics, abnormal rotation of the femur when weight bearing, and abnormal patellofemoral mechanics. This combination of issues multiplied over thousands of steps each day can result in anterior knee pain. Ok, so how do we fix it? My recommendation is to focus on the hip. Strengthening the weak hip muscles will almost always result in a cure. Unfortunately, this can sometimes takes weeks or months. Remember, we are rebuilding muscles that have gotten deconditioned over a long period of time. This takes time. Knee pain gradually resolves as hip strength gradually improves. The exercises I recommend are very simple:  Straight leg raise. Straight leg raise. Keep your knee locked in extension. Raise your leg from your hip keeping your toes pointing toward ceiling. Up and down counts as one repetition. Aim for a set of 30 repetitions. Then add sets. It is important to do these exercises on both sides, even if only one knee hurts. You want to keep things balanced.
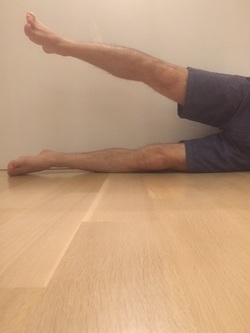
 Lateral raise. Lateral raise. Lateral raise. This exercise focuses on the hip abductor muscles. Lying on your side, slowly elevate the leg from your hip, keeping your knee straight and your toes pointing forward (not toward the ceiling). You should feel the burn on the side of your butt.
So, that's basically it. Remember, we are building hip muscles. It takes time. I recommend doing these exercises on both sides (even if only one knee is painful) so everything stays balanced. Each repetition should be done slowly when raising and lowering. You may be surprised by how challenging this set of hip exercises can be. You should work up to 3 sets of 30 repetitions for each muscle group. Repeat the workout twice per week. The total work-out should only take about 15 minutes. Resist the urge to do these exercises more frequently. The purpose of exercise is to stimulate the muscle to grow. It then needs to be allowed to grow, and this takes time. Stimulating the muscles with resistance exercise too frequently will be counter-productive.
When doing this exercise becomes easy, feel free to add some additional resistance. You can wear a boot, or use an ankle weight. It is a common misconception that one should exercise the quadriceps using a leg extension machine. This is a mistake and I would strongly suggest avoiding any knee isolation exercises in general, but when dealing with patellofemoral syndrome in particular. The knee extension machine will worsen anterior knee pain. Be patient, and consistent with these exercises. As your hip strength improves, your knee pain will improve as well. The difference between active and passive range of motion is easy for surgeons and physical therapists to understand, but is often unclear to patients.
Distinguishing between these two motions is crucial to properly rehabilitate certain surgeries, especially for a rotator cuff repair. Although I do my best to demonstrate each motion, and patients usually voice understanding, it is common for them to then demonstrate that they do not indeed understand. Active range of motion is what we normally do all day every day. Our body normally functions using a coordinated series of active motions. This motion is controlled by muscles. Muscles cross joints, which are where bones meet and move relative to each other. When a muscle contracts, a joint moves. This is active range of motion. Passive range of motion much less common in our normal daily activities. It requires a person to relax and allow their joint to be moved by an outside force. This force could be gravity, or another person (like a physical therapist), or a machine (like a stretching brace, or pulley). The rotator cuff is a commonly injured tendon. Repairing rotator cuff tears makes up a large part of my practice. I perform this surgery using an arthroscope, and it takes about an hour for me to repair the average rotator cuff tear. Patients usually go home the same day, wearing a special brace to protect the repair. This is where the hard work begins for the patient. Rehabilitating a repaired rotator cuff takes time, involves discomfort, and is not fun. It is also crucial to do it properly. Improperly rehabilitated rotator cuff repairs could result in problems. Inadequate stretching (passive range of motion) could cause stiffness. Too much active range of motion, too soon, could cause the repair to fail. I recommend thinking about rotator cuff rehabilitation as a sequence of 3 main phases:
It is very difficult to completely relax while someone, or something else moves your shoulder. Try to imagine your shoulder is paralyzed. Allow your arm to hang relaxed by your side. Then bend forward at your waist allowing your arm to swing away from your body under the influence of gravity . Keep bending at your waist as far as you can. At this point your arm will be hanging straight down, almost like you are trying to touch your toes or the floor in front of you. Now slowly stand up allowing your arm to gradually return to your side. Try to keep the arm completely relaxed throughout the entire motion. When you are standing upright again and your arm is at your side you are done. Congratulations. You just properly performed a basic passive range of motion exercise. In an upcoming post I will upload a video demonstrating this basic passive range of motion maneuver and a sequence of increasingly complex passive exercises. After this I will demonstrate active range of motion exercises. |
Dr. GorczynskiOrthopedic Surgeon focused on the entire patient, not just a single joint. Categories
All
|


 RSS Feed