
|
While some patients have a very easy time rehabilitating their knee replacement, the majority of patients find this surgery challenging to recover from. As surgeons, we do our best to provide clear instructions, multimodal pain control, encouragement and support to our patients. Even my own patients, who I personally counsel in the office, and are then directed to this website, often end up falling behind the ideal rehabilitation schedule because of this mistake.
What is this mistake? The mistake is finding an excuse not to stretch your knee. Excuses fall into a couple categories. A common category relates to physical therapy. "My therapist couldn't get me in for 7 days following surgery." "The therapist was sick and canceled several visits." "I am only getting 2 PT sessions each week." "My physical therapist only told me to stretch for 5 seconds each day." Some of these relate to scheduling, and some are clearly misunderstanding/miscommunication. I can't imagine anybody honestly expecting a good result after surgery stretching for a few seconds each day, certainly not a legitimate physical therapist. Other reasons for falling behind relate to the normal inflammatory process we expect after surgery. "My knee felt (hot/tight/swollen, etc)." "I was letting it heal a bit and feel better before stressing it." A third category involves what exactly I mean by rehabilitation. "I have been doing a ton of walking." I have been using my stationary bike." "I have been going up and down stairs." Please, please, please don't get caught in this trap. I know that total knee rehabilitation is unpleasant. I know that it seems strange for me to ask you to stretch a painful, swollen joint. The problem is that any delay in stretching your new knee replacement will make subsequent gains more difficult. Each day that goes by allows the capsular tissues to contract a bit more, allows scar tissue and adhesions to grow and thicken. Take personal responsibility for your own rehabilitation. Begin stretching immediately. Check out this website. It was primarily designed to help you recover after surgery. I have articles and videos explaining how to rehabilitate your knee replacement properly. I explain how often to stretch and for how long. I provide a timeline for recovery. Do not wait for a physical therapist to tell you what to do. You already know what to do. Use them as a resource. Impress them with how much range of motion you regain between physical therapy sessions. Do not expect them to rehabilitate your knee for you. That will not provide an excellent outcome. While walking/biking/etc. are fine things to do, they are really not ideal exercises for regaining knee range of motion. Walking requires very little knee range of motion, and even a stationary bike will not optimize stretching. This is why I direct patients to long duration, passive stretching exercises. These exercises are the most efficient way to recover motion following knee replacement surgery. Expect your knee to swell. It will become discolored. It will feel tight. It will hurt. Do not let these symptoms hold you back from stretching. My rehabilitation recommendations are made expecting these symptoms to occur. Swelling, bruising, and pain are all a normal part of the recovery process. Do not wait for them to resolve before stretching. If you wait, you are likely to compromise your outcome.
7 Comments
Flexing the hip while also flexing the knee focuses most of the stretch on the knee joint. These first two videos demonstrate different ways to accomplish that. In the video below, notice how I am using my torso to generate the force needed to flex the knee. I then take up the slack created in the yoga strap with my arms. Also feel free to use your other leg to help generate flexion force as I demonstrate. The next video demonstrates how to use the strap to improve knee flexion while keeping the hip extended. This is done in the prone position. This will focus more of the stretch on the quadriceps muscle. I recommend stretching in each of these positions for the best result. Excellent knee function also requires full knee extension. The strap can help you achieve this as well. In the following video, I loop the strap over the knee to be stretched. I then place my other foot through a loop in each limb of the strap so that it does not touch the ground, but applies an extension force to the knee. The use of a yoga strap for knee replacement rehabilitation is certainly not mandatory, but simply provides another option to assist you. Always remember to use ice after stretching, hold the stretches for as long as possible, and relax your mind and muscles as much as possible during the stretch.
In a previous post, I described what I feel to be the most important shoulder stretch. It is very important functionally to be able to reach out in front of you, and to reach overhead. While my focus in the prior post was frozen shoulder (otherwise known as adhesive capsulitis), the stretch I described is very useful for regaining function after rotator cuff surgery, shoulder labral repair surgery, and trauma. The anterior and inferior (front and bottom) shoulder capsule/ligaments are stretched using this technique. (Please note: If you are dealing with a frozen shoulder, this stretch may be too irritating to begin with. I recommend you begin with anterior, inferior capsule stretching using the best stretch for a frozen shoulder. You can come back here once you have regained the ability to raise your arm over your head again.) Sometimes, in spite of having done an outstanding job rehabilitating their shoulder following surgery, a patient may have some residual pain. Another common subset of patients presents with shoulder impingement syndrome or bursitis. These patients report pain which is usually lateral arm pain, aching in character, and may be worse at night. If forward elevation (reaching overhead), and abduction (reaching out to the side) are near normal, and rotator cuff strength is good, it is important to focus on the posterior capsule (ligaments in the back of the shoulder). A tight posterior capsule can cause abnormal shoulder mechanics. This can cause the shoulder ball (humeral head) to translate superiorly (upward) when raising the arm instead of rotating in the socket (glenoid). This pinches the rotator cuff and causes pain. The rotator cuff normally pushes down on the humeral head during rotation, but when it is irritated it will get lazy. Unfortunately, this compounds the problem, and allows the humeral head to further translate upward during activities. A cycle is then created whereby the problem gets progressively worse. We need to break this cycle. When I find the posterior capsule to be tight, I recommend using the sleeper stretch. This is a simple stretch that a patient can do on their own. As always, I recommend stretching every day, with no days off. I also recommend gentle progressive static stretching. That is, slowly applied pressure that is then held at the endpoint for relatively long duration. This means minutes rather than seconds. We are taking advantage of the viscoelastic nature of our soft tissues. The posterior capsule tends to be relatively thin tissue, and thus, this stretch does not require high force. 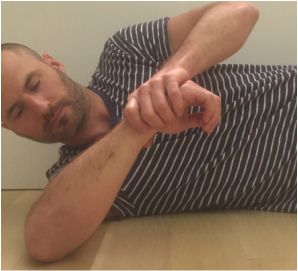 Posterior Capsule Stretch (Sleeper Stretch) Posterior Capsule Stretch (Sleeper Stretch) In these photos I am lying on my side. For this demonstration we will assume my right shoulder is the bad one. So, I am lying on the bad side. My elbow is out in front of me. The upper arm should be even with the shoulder. Both palms are facing toward my feet. Now gently and progressively apply force with the left hand. The goal should be to create rotation of the right palm toward the floor. This should create tension and stretching pain in the back of the shoulder. Ordinarily I would recommend resting your head on a pillow for comfort. I am not doing this to avoid obscuring the positioning. 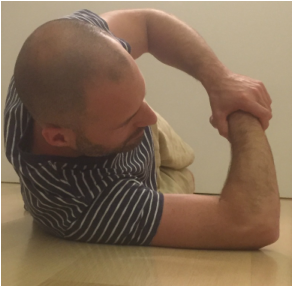 Posterior Capsule Stretch (sleeper stretch), viewed from above. Neutral position. Posterior Capsule Stretch (sleeper stretch), viewed from above. Neutral position. Here is the view from above. Again note my upper arm is at shoulder level and my palms are facing toward my feet. Pressure is applied rotating my right shoulder internally, and pushing palms toward the floor. 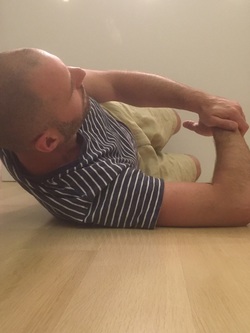 Posterior capsule stretch with torso leaning slightly back. This is a less aggressive position. Posterior capsule stretch with torso leaning slightly back. This is a less aggressive position. Here is a less aggressive position. It may be good to begin this way. You can place a pillow behind your back to lean against. For all of these positions, resting your head on a pillow will allow more relaxation and thus a more pleasant stretch that you can hold for a longer time period. 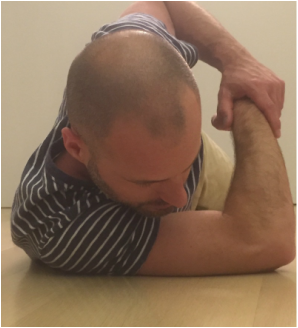 Posterior capsule stretch (sleeper stretch) with torso leaning forward. This is a more aggressive position. Posterior capsule stretch (sleeper stretch) with torso leaning forward. This is a more aggressive position. This is the most aggressive sleeper stretch position. This will concentrate more force on the posterior capsule. It may not always be necessary to regain balance. I recommend testing each of this positions on the other (good) side so you have a benchmark to assess what is normal for you. Some key points:
In an earlier post, I described my experience with a frozen shoulder. Here are some pictures showing exactly how I rehabilitated myself and how I recommend my patients stretch on a daily basis. 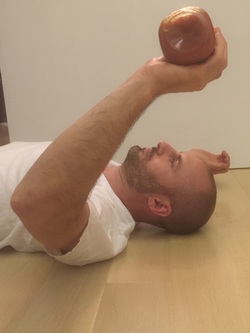 The best stretch for frozen shoulder - starting position - side view The best stretch for frozen shoulder - starting position - side view The initial position will look something like this. I am using a jar of sauce to provide some downward pressure. My good arm is placed in a similar position and allowed to rest with the shoulder, elbow, and wrist touching the floor. When your bad shoulder is hurting from the stretch, look over at your good shoulder and remind yourself what normal range of motion looks like. 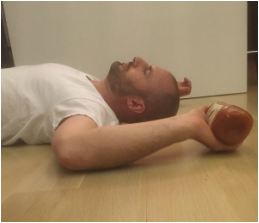 The best stretch for frozen shoulder - side view The best stretch for frozen shoulder - side view This is the goal. Now I am able to touch my shoulder, elbow, and wrist to the floor at the same time. You will not get to this point quickly. It will likely take hours of stretching like this over weeks to go from the first picture to this one. 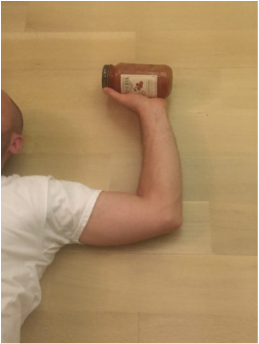 the best stretch for frozen shoulder - intermediate position the best stretch for frozen shoulder - intermediate position Here is how it looks from above. 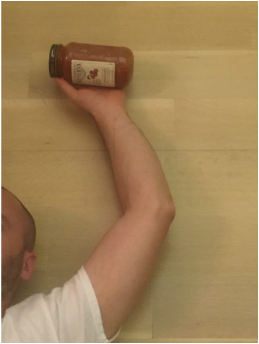 the best stretch for frozen shoulder - final position goal the best stretch for frozen shoulder - final position goal Gradually bringing your hand and elbow closer to your head will add additional stretch. Some key points:
Total knee replacement surgery is an effective way to relieve arthritis pain when non-operative measures have failed. A substantial portion of the outcome, however, is based on adequately rehabilitating after surgery. The most important part of the rehabilitation program is regaining normal range of motion. This is easier said than done. At the time of a properly performed knee replacement surgery, the soft tissues are balanced and the range of motion should be full. That is: all the way straight, to all the way bent. This is something we test during surgery. Then the incision is closed and the healing process begins. Initially, there could be some swelling and acute surgical pain from the incision/surgical approach. Soon this acute pain subsides and stiffness begins. The stiffness is experienced by many patients as pain, especially when moving against the endpoint. In a prior posting I discussed the tissue planes that need to glide to allow proper motion. Each day that passes after knee replacement surgery, more healing occurs. This process can create connections, or adhesions, between these tissues. After about 6 weeks, enough scar tissue has formed, that most patients are unable to obtain more range of motion by stretching. In other words, at around 6 weeks from surgery no more progress with regard to range of motion is possible. The trouble is, in order to regain excellent function, adequate knee range of motion is necessary. Most patients are anxious to walk, ride a stationary bike, and are often quite focused on regaining strength. While these are fine things to do, and I certainly understand this desire, redirecting the focus to stretching appropriately remains my priority during the first 6 weeks postoperatively. Once range of motion is reestablished, all of these activities will be possible. Because we have a limited time to regain this range of motion this needs to be the priority early on. Thankfully these stretches are simple. Gently and progressively force the knee straight. And then gently and progressively force the knee bent. Simple! Except when it's not. Sometimes, and fortunately it is rare, a patient really struggles to regain range of motion after their total knee replacement. This can be a very frustrating situation for the patient and surgeon alike. I recommend stretching early, often, gently, but progressively. It is better to regain motion early than to attempt to catch up when stiffness is setting in. The simplest stretches are shown below: 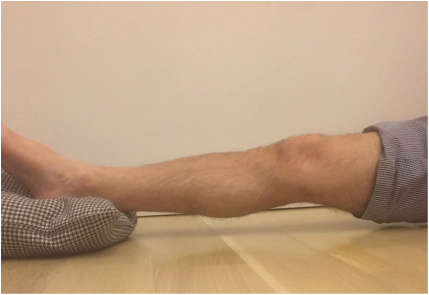 knee extension stretch knee extension stretch This is one of the easiest stretches for extension. Place your ankle on a pillow. Relax your muscles to allow your knee to sag down. Then attempt to push the back of your knee down. This is a side view of my knee. It is important to note that my kneecap and toes are pointing straight up. This stretch can be held for minutes, gradually relax your muscles more and more, allow gravity to do the work. The longer the stretch the more the viscoelastic tissues will elongate. 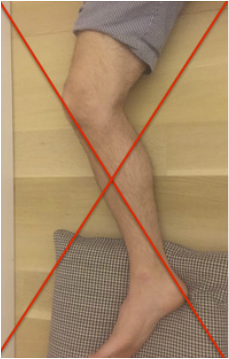 avoid external rotation when doing knee extension stretch avoid external rotation when doing knee extension stretch This is the wrong way to stretch. This is a view of my knee from above. There is a natural tendency to externally rotate as your hips relax. Our goals are not being accomplished if this is allowed to happen. If you find this happening, simply place additional pillows or folded blankets along the outside of your foot and thigh to hold your toes and kneecap pointing up. 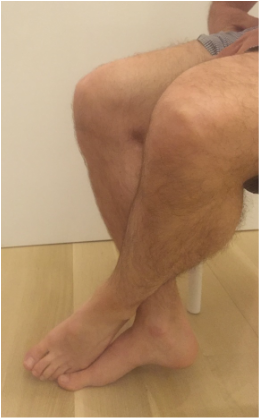 knee flexion stretch knee flexion stretch Now we are working on regaining flexion. In this example we are working on gaining flexion in my right knee (in the back ground of this photo). Here I have placed my left leg in front of my right ankle. I am using my left leg to help bend my stiff right knee more. This works best when done progressively over a period of minutes as opposed to seconds. Use your hamstrings in both legs to try to flex both knees further. 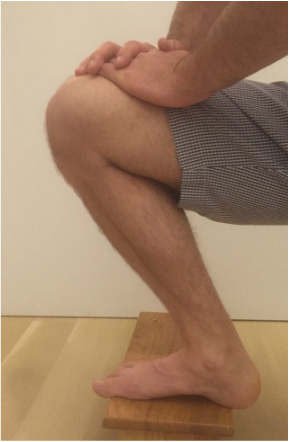 deeper knee flexion test using stepstool deeper knee flexion test using stepstool For deeper flexion than the previous stretch, this position utilizes a step-stool to provide deeper knee flexion. As shown, leaning forward and applying pressure with your hands can increase the stretch. 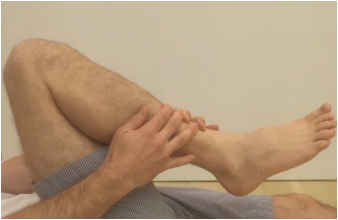 Deepest knee flexion stretch done in supine position Deepest knee flexion stretch done in supine position This is a stretch that can achieve extreme flexion. This time I am lying on my back. My knee is pointing up toward the ceiling. Flexing the hip relaxes the quadriceps. The hands are used to to pull the leg toward your body. The effect is increased hip and knee flexion. Please note: if you have a total hip replacement, be very careful with this position as it can produce significant hip flexion. These stretching positions should take care of 90% of total knee replacement patients. These stretches should be done everyday, ideally multiple times per day, with no days off. The longer the stretches can be held, the better. Remember to relax as much as possible while stretching and remember that a little pain is normal an expected. If no pain is encountered, I would recommend pushing a little bit harder. As always, if you have any specific questions about your particular case, discuss with your surgeon.
Occasionally we encounter a patient that has a very difficult time regaining motion. I have a few additional recommendations in these cases and will address that situation in an upcoming posting. Biologic tissues are viscoelastic. That means their stretchiness changes depending on how hard they are stretched. We can take advantage of this characteristic when we are rehabilitating a stiff joint. This becomes very important with certain medical problems. Specifically: total knee replacement and frozen shoulder. This concept is generally helpful in orthopedic rehabilitation and I take advantage of it whenever applicable. Think of silly putty. When slowly stretched it can be drawn out into a long strand, but when pulled aggressively it will snap and break in two. This is an extreme example of viscoelasticity. Your tissues are similar. While extreme force stretching can cause tissue to tear, this is generally far beyond any amount of stretching a patient can do, even with a physical therapist. A manipulation under anesthesia is a maneuver performed by a surgeon to rapidly regain motion in a particular joint that has become stiff. Tissues tear, and inflammation results. This is the most extreme example of a high force, low duration stretch. It is best to avoid this type of intervention if possible. It is preferable for a patient to spend the time necessary to recover joint range of motion using a long duration, low force stretch. It will result in less inflammation and less pain. Shoulders and knees commonly become stiff. Total knee rehabilitation requires stretching to regain range of motion after surgery. Stretching is required to speed up the recovery of a frozen shoulder. When attempting to regain range of motion patients are often told to stretch for 10-15 seconds and then relax. Over and over. Sometimes this is effective. Sometimes it is not. There is significant genetic variation with regard to tissue strength and inflammatory response, and significant psychological variation with regard to pain tolerance, and ability to relax while stretching. When a patient has trouble regaining range of motion I try to focus them on long duration, low force stretching. This tends to create less inflammation and is more likely to allow a patient to relax the muscles while stretching. Relaxing is very important because any muscle resistance will prevent gains in range of motion. 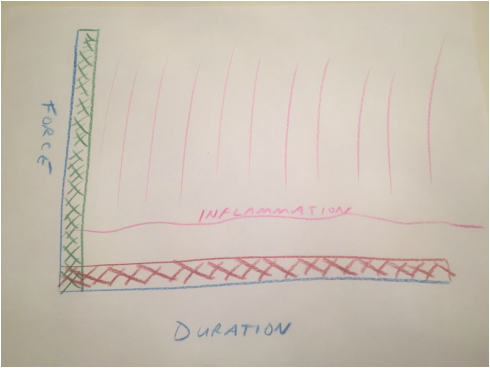 Force vs. duration stretching. A longer stretch done with less force will create less inflammation. Force vs. duration stretching. A longer stretch done with less force will create less inflammation. This sketch depicts how I think about stretching. A high force, brief stretch is more likely to cause inflammation. A gentle prolonged stretch is less likely to create an inflammatory response. The "amount of stretch" or the total area under the curve depicted by the hash marks could be identical, but my experience suggests the long duration, low force stretching will give a superior result. How do I know this? When I was a resident, I developed a frozen shoulder and used long duration, low force stretching to cure myself. I have subsequently recommended this technique to countless patients who presented with frozen shoulders that had failed to improve after many weeks of standard physical therapy. Although occasionally surgical intervention was necessary, the vast majority progressed using this technique and never needed surgery. This technique has become my standard recommendation following total knee replacement and to rehabilitate a frozen shoulder, and has minimized the need for manipulation.
 So you finally decided to have your arthritic knee replaced. You got through the surgery just fine. As expected, you had some surgical pain, but almost immediately you realized that your arthritic pain was gone. Awesome! Things seemed to be going very nicely, and now you are home... Your knee may begin feeling tight and warm. This is normal and expected. Healing occurs in part through an inflammatory process. Inflammation shows up as swelling, warmth, and pain. You have been told to stretch, but may be questioning this recommendation now. You may be concerned that because it hurts you could be damaging yourself or your new knee. This is a very common concern. Please resist the urge to stop stretching. The knee is a complex joint. There several moving parts and potential spaces (otherwise known as tissue planes). During total knee replacement these parts are moved around , the tissue planes are opened. I think it makes sense to patients when they have some pain after surgery. But as the wound is healing on the outside, why does it feel like things are getting worse on the inside? As the healing process proceeds, the tissue planes that have been opened begin sticking together. Gradually adhesions, or scar tissue, may form between these planes preventing them from gliding properly. Initially this scar tissue is weak, but it will get stronger every day. For this reason, there is some urgency to regain range of motion as soon as possible. This is because after about 6 weeks or so from surgery this scar tissue becomes strong enough that a patient is unlikely to be able to stretch it out any more. The range of motion you have achieved at this point will be how far your knee will move permanently...without additional intervention. To better understand knee range of motion lets begin with a couple of definitions. Flexion of the knee means bending. When you sit in a chair and your feet are flat on the floor, your knee is bent, or flexed. Extension of the knee means straightened. When you stand up and your knee is straight it is extended. Now lets discuss these tissue planes a bit. 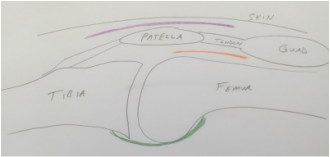 Tissue layers in the knee that must be stretched following total knee replacement. Tissue layers in the knee that must be stretched following total knee replacement. The skin must be able to slide over the kneecap (patella). The body achieves this by only loosely attaching the skin to the patella. This loose connective tissue allows motion to occur. Under abnormal conditions, fluid can collect here and create swelling. A potential space such as this is referred to as a bursa. The loose connective tissue found here is called bursal tissue. The specific space, or tissue plane, between the skin and the kneecap is called the pre-patellar bursa. It is shown in purple in my sketch. The kneecap (patella) is embedded within the tendon that attaches your thigh muscles (quadriceps) to your shin bone (tibia). A tendon is the tissue that attaches muscle to bone. The quadriceps tendon must be able to slide relative to the thigh bone (femur). The area above the patella shown in my sketch as orange is called the supra-patellar pouch. If either of these tissue planes sticks together, the knee will not be able to bend completely. In the back of the knee there is a sheet of tissue called the posterior capsule. This is green in my sketch. This tissue is irritated during surgery and will gradually tighten as it heals. If this is allowed to happen, the knee will not fully extend. So, how do you prevent a stiff total knee? It is not by walking around a lot. It is not by cycling the knee back and forth a lot. It is by gently and progressively stretching. Even though it hurts. The longer you are from surgery, the longer these stretching sessions must be because the scar tissue becomes stronger each day. Gentle progressive stretching works by taking advantage of the viscoelastic nature of biologic tissues. My basic recommendations:
|
Dr. GorczynskiOrthopedic Surgeon focused on the entire patient, not just a single joint. Categories
All
|
 RSS Feed